Hand-building guide
What tools do I need for hand building with clay?
By Slab Marks · Updated October 2026
The short answer: to start hand building with slabs of clay you need clay, a rolling pin, two guide sticks, a piece of canvas to roll on, a needle tool or craft knife, a rib, a sponge, something to score with, slip, plastic to slow the drying, and a template. Most of it costs little or is already in your kitchen. The one thing you can't improvise is a kiln, so plan where your pieces will be fired.
The template is the one tool you don't have to buy: the free Slab Marks template maker prints one to size. See how it works ↓
Make my template, freeThe essentials
| Tool | What it's for | Cheap stand-in |
|---|---|---|
| Clay | Everything (see below for which kind) | None: buy a bag from a pottery supplier or your studio |
| Rolling pin | Rolling the slab | A plain wooden rolling pin or a length of hardwood dowel |
| Guide sticks (a pair) | Keeping the slab one even thickness | Two wooden strips the same thickness, like stacked paint stirrers |
| Canvas | A surface the clay won't stick to | A canvas drop cloth or heavy cotton fabric |
| Needle tool | Tracing templates, checking thickness, popping air bubbles | A long pin or a straightened paper clip |
| Craft or fettling knife | Clean cuts along the template | A sharp craft knife |
| Ruler | Measuring slabs and checking prints | Any ruler |
| Rib | Compressing and smoothing the slab and seams | An old gift card |
| Sponge | Smoothing edges and rims | A clean kitchen sponge |
| Scoring tool | Roughening edges before joining | A fork |
| Slip | Clay "glue" for joins | Your clay mixed with water to a yoghurt-like paste, in a jar |
| Plastic | Slowing the drying so pieces stay workable and don't crack | Dry-cleaning bags or grocery bags |
| Template | Cutting the right shape at the right size | Card or thin plastic, printed from Slab Marks |
Which clay is best for slab building?
- Match the clay to the kiln. Every clay has a firing temperature. Low-fire earthenware, mid-fire stoneware and porcelain all need different kiln settings, so ask your studio or firing service what they fire before you buy.
- A clay with some grog is easier. Grog is fired clay ground into small grains. It makes slabs less likely to warp and crack, which helps a lot when you're starting out. Smooth clays are lovely to touch but less forgiving.
- Know its shrinkage. Clays shrink by roughly 7% (low-fire earthenware) to 15% (porcelain) between wet and fired. Your template has to be scaled up by the right amount, so check the number on the bag or in the supplier's data. See how to calculate clay shrinkage.
Nice to have
- Forms to wrap around: PVC pipe, cardboard tubes, jars or cans for mugs and tumblers. Wrap them in newspaper so the clay slides off.
- Ware boards: flat boards to build on and move pieces around without touching them.
- A banding wheel: a turntable that lets you work all the way round a piece.
- A spray bottle: to keep edges damp while you work.
- Texture tools: stamps, lace, leaves or a textured rolling pin, pressed into the slab before you cut.
- A slab roller: handy if your studio has one, never essential. See how to roll a clay slab.
Where to fire your pieces
Clay needs a kiln to become hard, permanent pottery. If you don't have one, look for a community pottery studio, a makerspace, a local college or adult-education class, or a firing service, where you drop pieces off and collect them fired. If you make mugs or plates, use glazes that are labelled food-safe for your firing temperature.
Air-dry clay can be shaped with the same slab methods, but it's never waterproof or food-safe, so it's for decorative pieces only.
Templates: card or plastic?
Card is fine for trying out a size. For a template you'll use again and again, thin plastic is better: it wipes clean, doesn't soak up water from the clay and keeps a crisp edge. Write the clay, the shrinkage and the finished size on each one. More in how to make your own pottery templates.
How to do it in Slab Marks
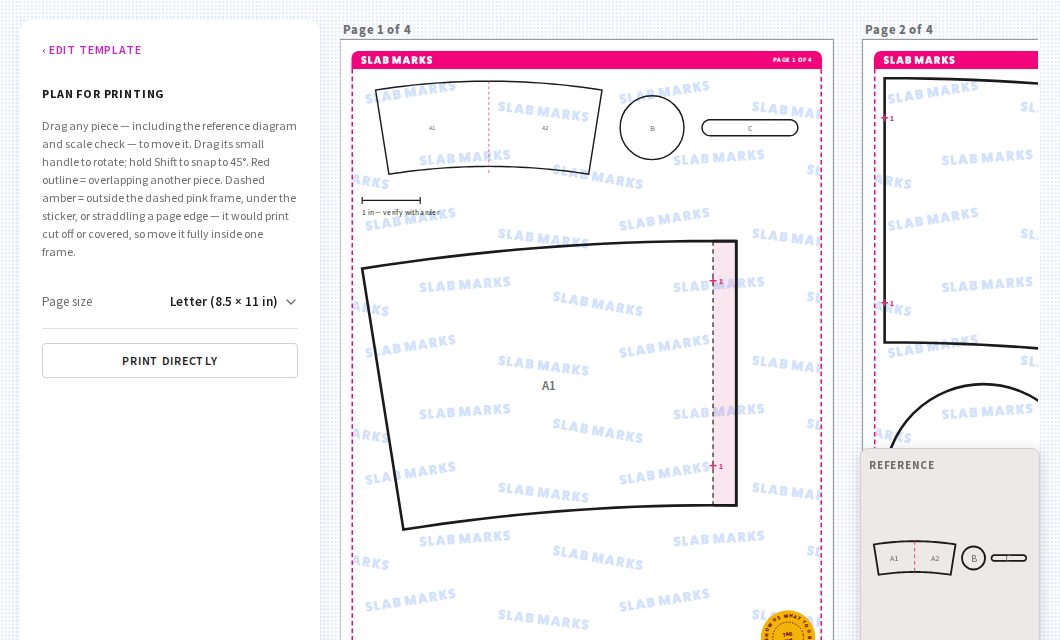
- On the homepage, pick a form: mug, tumbler, tapered cup, box, cone or a flat shape.
- Enter the finished size you want and pick your clay under Clay body. Shrinkage is added for you.
- Click Print template, choose Letter or A4, and print at 100% (never "fit to page"). Check the 1-inch bar with a ruler.
- Glue the print to card, or trace it onto thin plastic, and cut it out.
Common questions
Do I need a slab roller for hand building?
No. A rolling pin and two guide sticks make slabs just as even. A slab roller only saves time and effort.
Can I do slab pottery without a kiln?
You can build the pieces anywhere, but they need a kiln to be fired. Community studios and firing services will fire them for you. Air-dry clay works for decorative pieces, but it's never waterproof or food-safe.
What clay is best for beginners?
A mid-fire stoneware with some grog is forgiving and widely fired. Check what your studio or firing service fires before you buy.
What is slip?
Clay mixed with water into a thick paste. You brush it on scored edges to glue pieces together.
Be first to know
Join the list for new template forms and easy hand-building project ideas for those "okay… now what?" moments.
No spam, unsubscribe anytime. How I handle your email