Hand-building guide
How to roll a clay slab
By Slab Marks · Updated October 2026
The short answer: wedge the clay, flatten it, then roll it on canvas between two guide sticks so the rolling pin rides on the sticks and the slab comes out one even thickness. Roll from the centre outwards, flip and turn the slab between passes, and finish by compressing both sides with a rib. In a studio, a slab roller does the rolling: set the thickness, sandwich the clay in canvas and crank it through.
Rolling is done by hand, but the free Slab Marks template maker tells you how big to roll and gives you the template to cut. Where it fits in ↓
Make my template, freeBefore you start: how big to roll
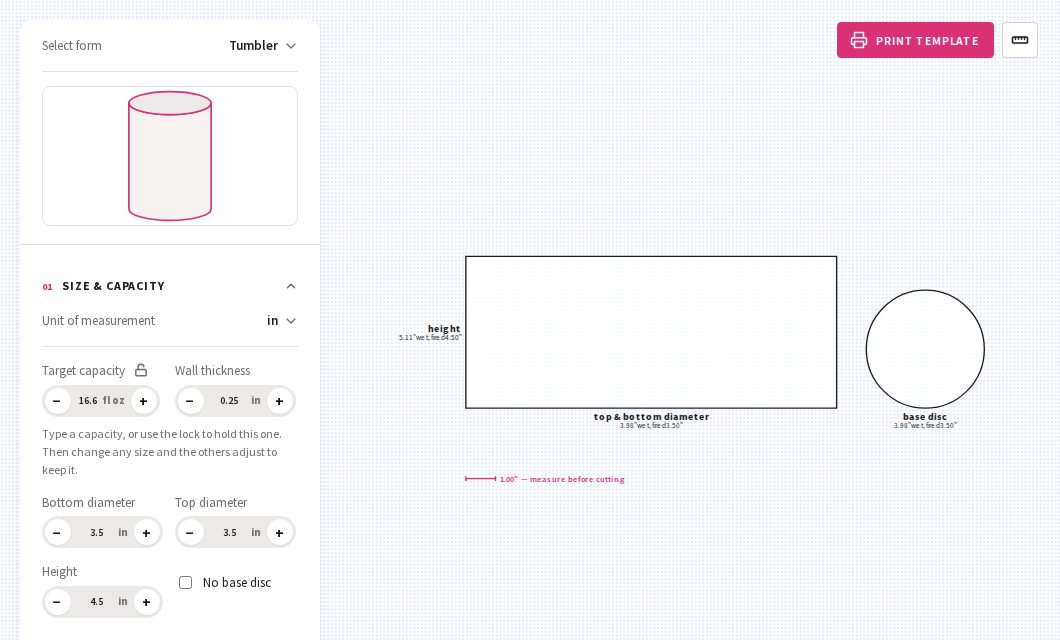
Roll the slab at least 1 in (2 to 3 cm) bigger than your template all the way round, because the edges are usually uneven. For example, the wall of a 3.5 × 4.5 in tumbler, which holds about 16.6 oz, is 12.49 × 5.11 in before firing (more tumbler sizes), so roll about 14.5 × 7 in. At 1/4 in thick, that takes about 2 lb (1 kg) of clay.
Not sure how thick to go? 1/4 in (about 6 mm) suits most mugs and cups. See how thick should my slabs be?.
By hand, with a rolling pin
- Wedge the clay. Knead it for a minute or two to push out air bubbles and even out how wet it is.
- Flatten it. Pat it into a thick pancake, or throw it down onto the canvas at a slight angle, turning it each time, until it's about 1 in thick. This is quicker and gentler on your arms than rolling from a lump.
- Set up the guide sticks. Lay one stick on each side of the clay, parallel, a little closer together than your rolling pin is long.
- Roll from the centre out. Start in the middle and roll towards each end with light, even pressure. Don't try to get there in one go.
- Flip and turn. Every few passes, lay canvas on top, flip the slab over, and turn it a quarter turn. Rolling only one way stretches the clay in one direction, and it tends to warp that way when it dries.
- Keep going until the pin rides on both sticks across the whole slab. Now it's one even thickness.
- Compress both sides. Run a rib across the slab in a few directions, then flip it and do the other side. This smooths out the canvas texture and makes the slab much less likely to crack or warp.
- Pop any air bubbles with a needle tool and press the spot flat with the rib.
With a slab roller, in the studio
- Check the thickness setting. Some rollers have a dial or wheel, others use boards slid under the canvas. The canvas adds a little thickness, so roll a test piece and measure it. If you share the roller, ask before changing the setting and put it back afterwards.
- Wedge and flatten the clay to about 1 to 1.5 in thick, and press one end thinner so it feeds into the rollers easily.
- Sandwich it between two sheets of canvas, thin end first.
- Crank it through in one smooth, steady pass.
- For a thin slab, use two passes. Roll it once at a thicker setting, then turn the clay a quarter turn and roll again at your final setting. Big jumps in one pass can tear the clay or crease the canvas.
- Peel back the top canvas slowly, then flip the slab onto a board and peel off the other. Compress both sides with a rib, just as you would by hand.
- Clean up: scrape any clay off the rollers and canvas, and hang the canvas up to dry.
Common problems and fixes
| Problem | Why it happens | Fix |
|---|---|---|
| Clay sticks to the canvas | The clay or the canvas is too wet | Use dry canvas, or let the clay firm up for a few minutes |
| Cracked edges | The clay is too dry | Use softer clay, or wedge in a little water; compress the edges with a rib |
| Uneven thickness | The pin didn't reach both sticks everywhere | Keep rolling until it does, and check with a needle tool |
| Warps as it dries | Rolled in one direction, or dried unevenly | Flip and turn between passes, compress both sides, dry slowly under plastic |
| Bumps and blisters | Trapped air | Wedge well first; pop bubbles with a needle tool and press flat |
After rolling
For flat pieces like plates, you can cut straight away. For walls that need to stand up, like mugs and boxes, cover the slab loosely with plastic and let it firm up to soft leather-hard, when you can pick it up by one edge without it stretching or flopping. Depending on the clay and the room, that takes from about 20 minutes to a couple of hours.
Where Slab Marks comes in
The rolling itself is all hands and clay. What Slab Marks does is tell you how big to roll, and give you the template you'll cut from the slab once it's rolled.
- Before you roll, open the template maker and pick your form, for example Tumbler.
- Enter the finished size and pick your clay under Clay body.
- Read the sizes on the pattern: each label shows the size to cut before firing (wet). Roll your slab about 1 in bigger than the largest piece all round.
- Click Print template and cut it out. Once your slab is rolled and compressed, lay the template on it and trace around it.
Common questions
How thick should I roll my slab?
About 1/4 in (6 mm) for mugs, cups and most first projects. See the thickness chart for other pieces.
Can I roll clay without canvas?
Clay sticks to most smooth surfaces like plastic, glass or a sealed table. Canvas or heavy cotton lets it release.
How long should a slab dry before I build with it?
Until it's soft leather-hard: you can lift it by one edge without it stretching. That's anything from about 20 minutes to a couple of hours, depending on the clay and the room.
Can I reuse slab scraps?
Yes. Keep scraps wrapped so they stay soft and wedge them back into your next batch. Dried scraps can be soaked in water and reclaimed.
Be first to know
Join the list for new template forms and easy hand-building project ideas for those "okay… now what?" moments.
No spam, unsubscribe anytime. How I handle your email