Hand-building guide
How to make your own pottery templates
By Slab Marks · Updated October 2026
The short answer: decide how big you want the piece to be after firing, scale every measurement up for your clay's shrinkage (divide by 1 minus the shrink rate), then draw the flat shape. Straight-sided mugs and tumblers unroll into a rectangle; tapered cups unroll into a curved band. Cut that shape from card or thin plastic, lay it on your slab and trace around it.
The old-school way
Break out the protractor
Plan on an afternoon at the kitchen table with:
- a calculator, for shrinkage and π
- square roots, to find the arc radii of a tapered cup
- a compass, or a pencil tied to a string, for arcs with an 18 in radius
- a protractor, to measure out angles like 44.7°
- an eraser, for when the ends don't quite meet
The shortcut
Let Slab Marks do the math
Type in the finished height and diameter you want and pick your clay. The free template maker applies the shrinkage, works out the curve and prints a to-scale template, split across pages if it's big, in about a minute.
Make my template, free See how it works ↓What you need
- Your target size: the height and diameter you want the finished, fired piece to be.
- Your clay's shrinkage rate: on the clay bag or the maker's data sheet, or measured with a test tile (see below).
- Template material: card stock or poster board for a few uses; thin plastic (a plastic folder or template plastic) for a template you'll reuse on damp clay.
- A ruler, a pencil, a calculator and a craft knife or scissors. For tapered shapes, a compass (or a pencil on a string) and a protractor.
Step 1: Decide the finished size
Start from the piece you want to hold in your hand, not the slab. Measure a mug or cup you like: its height and its outside diameter. Those are your fired measurements, and everything else is worked out from them.
Step 2: Scale up for clay shrinkage
Clay shrinks as it dries and again in the kiln, so the slab has to be cut bigger than the finished piece. Clay makers quote total shrinkage as a percentage of the wet size, so the correct way to scale is to divide:
Cut size = finished size ÷ (1 − shrinkage)For a clay that shrinks 12%, divide by 0.88. A mug that should be 4 in tall after firing needs a slab 4 ÷ 0.88 = 4.55 in tall.
A common mistake is to multiply by 1.12 instead. That gives 4.48 in, and the mug comes out of the kiln smaller than planned. The gap grows with bigger pieces and higher shrinkage.
| Clay type | Typical shrinkage | Multiply by | 4 in finished → cut |
|---|---|---|---|
| Low-fire earthenware (cone 05–06) | ~7% | 1.075 | 4.30 in |
| Mid-fire stoneware (cone 5–6) | ~12% | 1.136 | 4.55 in |
| High-fire stoneware (cone 9–10) | ~13% | 1.149 | 4.60 in |
| Porcelain (cone 6–10) | ~15% | 1.176 | 4.71 in |
Typical shrinkage rates. Your clay body may differ, so check its data sheet or test it.
More detail, plus ready-made tables in inches and centimetres: how to calculate clay shrinkage.
How to measure your own clay's shrinkage
- Roll a test tile from the clay you'll use and draw a line exactly 10 cm long on it while it's wet.
- Let it dry and fire it to the temperature you'll use for the real piece.
- Measure the line again. Shrinkage % = (10 − fired length) ÷ 10 × 100. A line that fires to 8.8 cm means 12% shrinkage.
Step 3: Draw the flat shape
Straight-sided mugs and tumblers: a rectangle
A cylinder unrolls into a rectangle. Its height is the scaled-up height, and its length is the distance around the scaled-up diameter:
Length = π × diameter (≈ 3.14 × diameter)Example: a mug 3.5 in wide and 4 in tall after firing, in a 12% stoneware. Scaled up, the diameter is 3.98 in and the height is 4.55 in. The rectangle is 3.14 × 3.98 = 12.49 in long by 4.55 in tall, plus a base disc 3.98 in across.
Tapered cups: a curved band, not a rectangle
A cup that's wider at the top than the bottom is a slice of a cone. Unrolled, a cone becomes part of a ring, so the template is a curved band: two arcs sharing one centre point. A rectangle wrapped into a taper won't close evenly or sit flat on the table.
To draw one by hand, work with the scaled-up sizes. Call the big radius R (half the wider diameter), the small radius r, and the height h:
- Side length: s = √(h² + (R − r)²). This is the slanted wall, measured along the clay.
- Outer arc radius: L = s × R ÷ (R − r). Inner arc radius: L − s.
- Angle of the band: 360° × R ÷ L.
- With a compass or a pencil on a string, draw both arcs from one centre point. Measure the angle with a protractor and join the ends with straight lines.
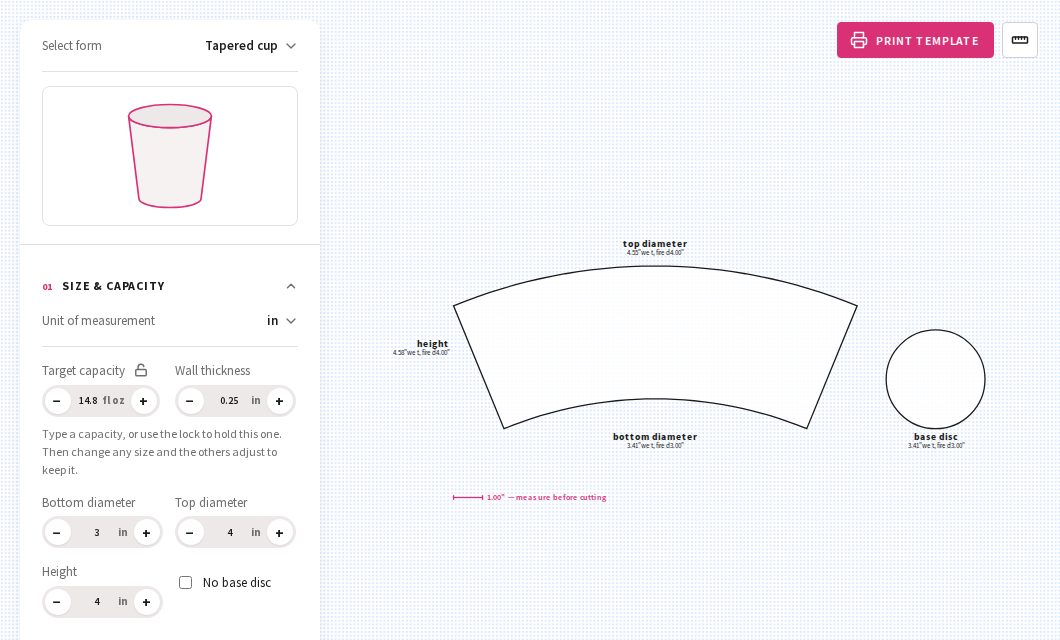
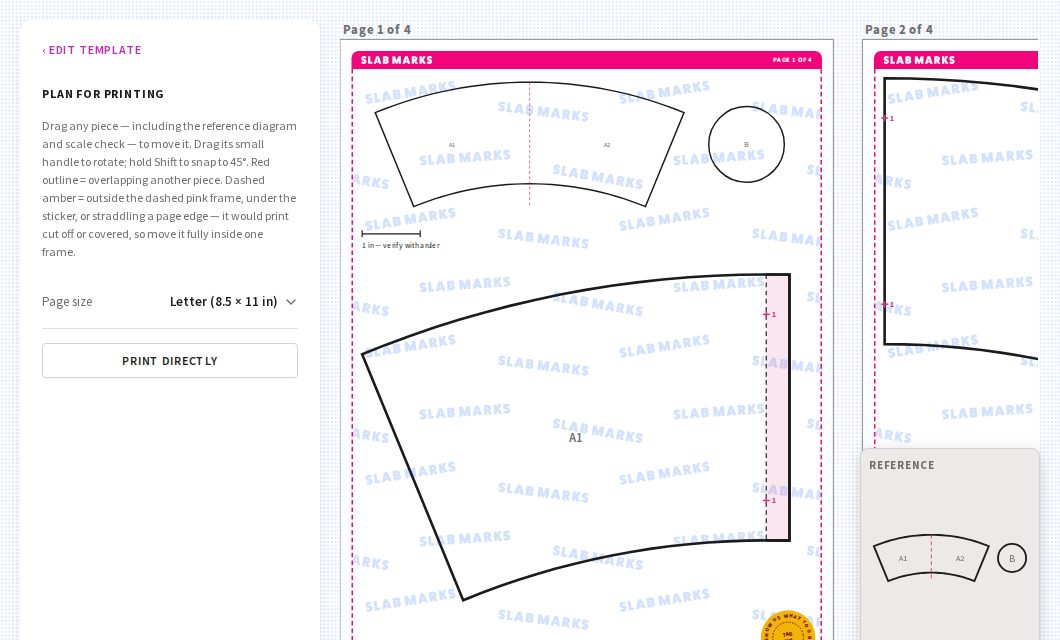
Example: a cup 3 in across the bottom, 4 in across the top and 4 in tall, in 12% stoneware. The outer arc has an 18.32 in radius, the inner arc 13.74 in, and the band spans 44.7°. The base disc is 3.41 in across. Those radii are why big tapered templates usually need taping together across several printed pages.
Step 4: Make the template and use it
- Print or draw it at full size. If you print, choose 100% or "Actual size", never "Fit to page", and check a measurement with a ruler before cutting.
- Transfer it to your template material and cut it out cleanly. Label it with the clay, the shrinkage rate and the finished size, so you can reuse it.
- Roll an even slab, using guide sticks so the thickness is the same all over, and compress both sides with a rib.
- Lay the template on the slab and trace around it with a needle tool or knife.
- Wait until the slab is soft leather-hard, firm enough to stand but still able to bend without cracking, then wrap it, join the seam (bevel, score and slip the edges) and add the base.
How to do it in Slab Marks
Here's the same tapered cup from the example above, done in the free template maker. It takes about a minute, and there's nothing to calculate.
- On the homepage, pick Tapered cup.
- Enter the finished size you want: bottom diameter 3 in, top diameter 4 in, height 4 in. You can work in inches, centimetres or millimetres.
- Open Clay body and pick your clay. Mid-fire stoneware (~12%) is already selected; you can also type your own shrinkage.
- The curved template appears straight away, already scaled for shrinkage. Every label shows two sizes: wet, the size you cut, and fired, the size you'll get.
- Click Print template. Big pieces are split across pages with matching marks, so you can tape them back together.
- Click Print directly, print at 100% ("Actual size"), and check the 1-inch bar with a ruler before cutting.
Common questions
Why did my mug come out smaller than I planned?
Usually because the shrinkage was added by multiplying (×1.12) instead of dividing (÷0.88), or because the clay shrinks more than the number used. Test-tile your clay to find its real rate.
Can I work in centimetres?
Yes. The formulas work the same in any unit, as long as you use one unit throughout.
What's the best material for a reusable template?
Thin plastic. It wipes clean, doesn't absorb water from the clay and keeps a crisp edge. Card is fine for testing a size.
Do I need a different template for every size?
Yes. Every change in height, diameter, taper or clay body changes the shape, which is why it pays to label each template.
Be first to know
Join the list for new template forms and easy hand-building project ideas for those "okay… now what?" moments.
No spam, unsubscribe anytime. How I handle your email