Hand-building guide
How to make a tapered cup template
By Slab Marks · Updated October 2026
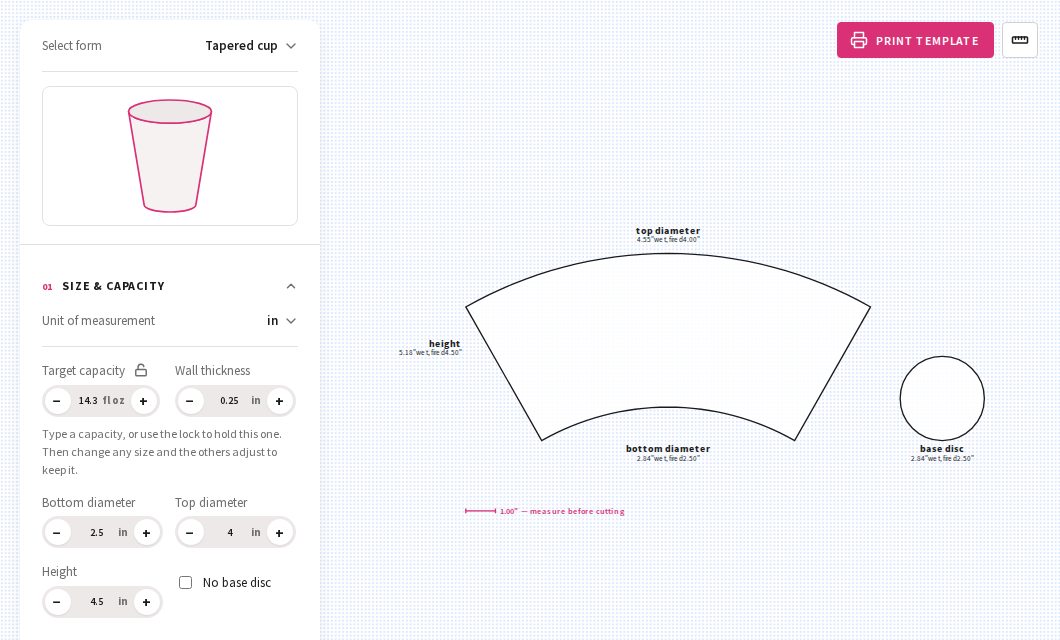
The short answer: a cup that's wider at the top unrolls into a curved band, not a rectangle: two arcs drawn from the same centre point. For a cup 2.5 in across the bottom, 4 in across the top and 4.5 in tall in mid-fire stoneware (about 12% shrinkage), draw the outer arc at a 13.82 in radius and the inner arc at 8.64 in, spanning 59.2°, plus a 2.84 in base disc. It holds about 14.3 oz.
Rather skip the compass? The free Slab Marks template maker draws the curve for any size. See how it works ↓
Make my template, freeWhy is a tapered cup template curved?
A tapered cup is a slice of a cone with the point cut off. Unroll a cone and you get part of a ring, so the pattern for the cup wall is a curved band. The top rim is the long outer arc, the bottom edge is the short inner arc, and the two straight ends become the seam.
If you wrap a plain rectangle into a taper instead, the top and bottom edges won't line up at the seam and the cup won't sit level. The curve is what makes the rim come out flat.
Step 1: Scale your sizes up for shrinkage
Clay shrinks as it dries and fires, so draw the pattern bigger than the cup you want. Divide every finished size by (1 − your shrinkage rate). For mid-fire stoneware at about 12%, divide by 0.88:
| Size | Finished (in) | To draw (in) |
|---|---|---|
| Top diameter | 4 | 4.55 |
| Bottom diameter | 2.5 | 2.84 |
| Height | 4.5 | 5.11 |
Not sure of your clay's rate? See how to calculate clay shrinkage.
Step 2, the no-maths way: draw a full-size side view
This is the classic way potters do it, with just a ruler and a pencil. You need a sheet of paper at least 15 in long, so tape two sheets together.
- Draw a straight line down the middle of the paper. This is the centre line.
- Near the top, draw a line across it as long as the scaled-up top diameter (4.55 in), centred on the centre line.
- 5.11 in below it (the scaled-up height), draw a line as long as the scaled-up bottom diameter (2.84 in), also centred.
- Join the ends to make the slanted sides of the cup. Then lay a ruler along one slanted side and extend it down until it crosses the centre line. The other side will cross at the same point.
- Measure from that point to the end of the top line: that's the outer radius (13.82 in). Measure to the end of the bottom line: that's the inner radius (8.64 in).
- On a fresh sheet, draw both arcs from one centre point with a pencil on a string (or a long compass).
- Mark how long the top rim must be along the outer arc: π × 4.55 = 14.28 in. Measure it with a flexible tape or a piece of string laid along the curve, then draw a straight line from each end back to the centre point. Where those lines cross the arcs are the corners of your template.
Step 2, the calculator way
If you'd rather calculate than draw, use the scaled-up sizes: T is the top diameter, B the bottom diameter and h the height.
Side length s = √(h² + ((T − B) ÷ 2)²) Outer radius = s × T ÷ (T − B) · Inner radius = outer − s Angle = 180° × T ÷ outer radiusExample: s = √(5.11² + 0.85²) = 5.18 in. Outer radius = 5.18 × 4.55 ÷ 1.70 = 13.82 in, inner radius = 13.82 − 5.18 = 8.64 in, and the angle is 180 × 4.55 ÷ 13.82 = 59.2°. Keep all the decimals in your calculator until the end, or the result can drift by a few hundredths.
Draw both arcs from one point, measure the angle with a protractor, and join the ends with straight lines that point back to the centre. The base is a circle the size of the scaled-up bottom diameter: 2.84 in.
Tapered cup sizes
The same cup shape in four sizes, with 1/4 in walls, filled to the brim. Bottom, top and height are the finished sizes; the arc radii (outer / inner) and base are what to draw, for mid-fire stoneware (about 12%). All four bands span about 59°, because they're the same shape at different sizes.
| Holds | Bottom / top / height (in) | Arcs (in) | Base (in) |
|---|---|---|---|
| 8 oz | 2.11 / 3.38 / 3.80 | 11.65 / 7.27 | 2.40 |
| 12 oz | 2.37 / 3.80 / 4.27 | 13.07 / 8.15 | 2.69 |
| 14.3 oz | 2.5 / 4 / 4.5 | 13.82 / 8.64 | 2.84 |
| 16 oz | 2.58 / 4.13 / 4.65 | 14.27 / 8.92 | 2.93 |
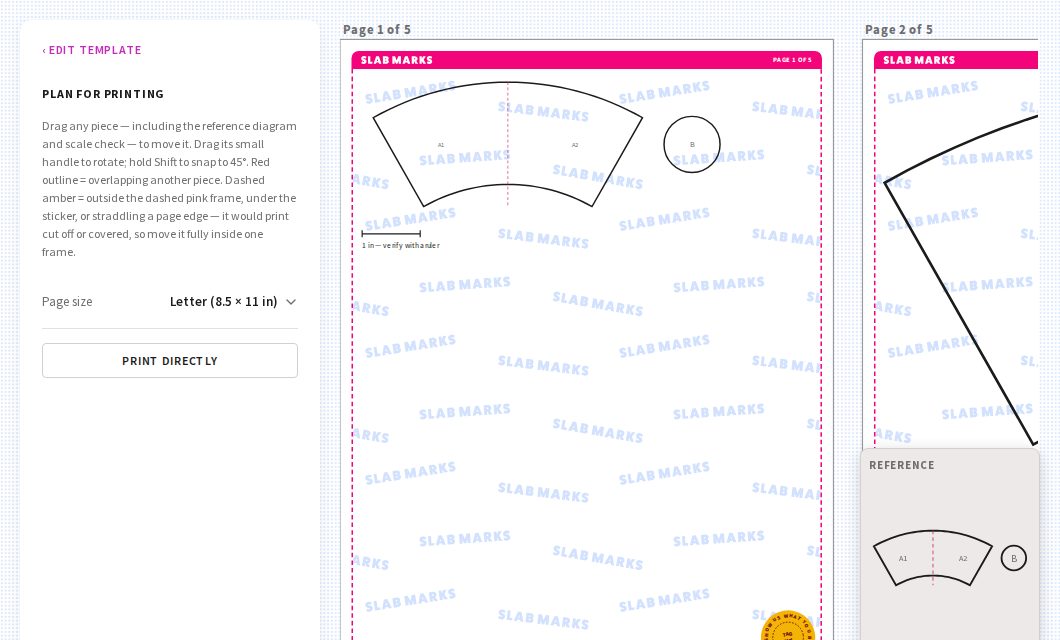
The pattern for the 14.3 oz cup is about 13.7 in wide, so it won't fit on one sheet of Letter or A4. Print it across two or more pages and tape them together.
How the taper changes the curve
The more your cup flares, the tighter the curve. A gentle taper gives huge arcs that look almost straight: a cup 3 in across the bottom and 3.5 in across the top, 4.5 in tall, needs a 35.85 in outer radius and spans only 20°. A strong flare gives a short, deep curve. That's why every size and shape needs its own template.
Want it wider at the bottom instead, like a tumbler that's steadier on the table? The pattern is the same shape, just used the other way up: the long arc becomes the bottom edge and the base disc gets bigger.
Building the cup
- Test it in paper first. Cut the template from card, roll it into a cone and tape the seam. It shows you the size and flare before you touch clay.
- Roll an even slab, about 1/4 in thick (see how thick should my slabs be?), and trace the band and the base.
- Let the pieces firm up to soft leather-hard so the wall holds its curve without slumping.
- Wrap the band around a form: a paper cone made from your card template works well, or a plastic cup or tub wrapped in newspaper so the clay doesn't stick.
- Bevel the two straight ends, score and slip them, and press the seam together. Compress it inside and out with a rib.
- Score and slip the base, set the narrow end of the cup on it and press down. Blend and compress the join, then trim off any extra base.
How to do it in Slab Marks
- On the homepage, pick Tapered cup.
- Enter the finished Bottom diameter, Top diameter and Height, or type a Target capacity like 12 oz and the sizes adjust to hold it.
- Pick your clay under Clay body. The curved pattern redraws straight away, already scaled for shrinkage.
- Click Print template. The print layout splits the curve across pages (marked A1, A2 and so on) so you can tape them back together, and every page has a 1-inch bar to check the scale.
Common questions
Why is my tapered cup template curved?
Because a tapered cup is a slice of a cone, and a cone unrolls into part of a ring. The curve is what lets the rim and the base come out level.
Can I use a rectangle for a slightly tapered cup?
Not really. Even with a small taper, a rectangle leaves the rim uneven at the seam. With a gentle taper the arc is so wide it looks almost straight, but it still needs to be an arc.
Why doesn't my cup's rim sit level?
Usually because the straight ends of the template don't point back to the centre of the arcs, or the seam overlaps more at one end. Redraw the ends as lines to the centre point, and join the seam edge to edge.
Why is the side of the template longer than the cup's height?
The wall leans, so the slanted side is a little longer than the upright height. For the example cup, the side you cut is 5.18 in, while the upright height before firing is 5.11 in.
Be first to know
Join the list for new template forms and easy hand-building project ideas for those "okay… now what?" moments.
No spam, unsubscribe anytime. How I handle your email